
WONDERTEA TUTORIAL
Tutorial written by Marcia Salgado on August 10th, 2015
for those who have a working knowledge of PSP and Animation Shop.
Any resemblance to any other tutorial is coincidental.
Do not copy and paste this tutorial anywhere on the net.
If you want to translate please ask first.
****************************************
Material:
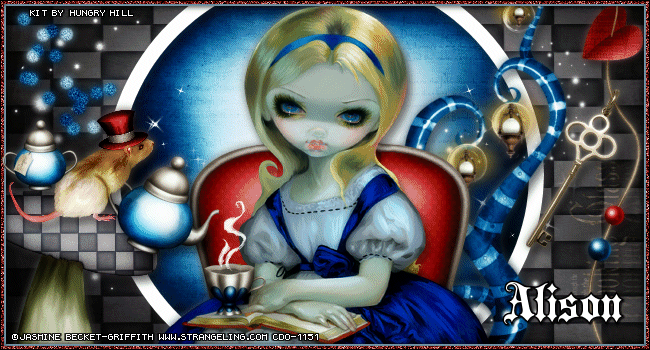
Tube: "Alice And The Bouguereau Princesses" by Jasmine Becket Griffith,
you can purchase it here,
do not use without the proper #license.
PTU Kit "Go Ask Alice" by Hungry Hill,
you can purchase it here
Animation: Scrappy Bit of Fun, SimoneAni-CelineMatch4-004 here
Font: Blackletter
****************************************
--> Remember to save often and use my tag as reference if necessary. Use a suitable drop shadow on layers.
1. Create a new image 650x350. Select all. Add a new layer.
2. Open paper-7. Copy and paste into selection. Deselect.
3. Open sparkles. Resize 40%. Copy and paste as new layer. Move it way left and up. Duplicate. Mirror.
4. Open sparkles-2. Resize 70%. Mirror. Copy and paste as new layer.
5. Using your Preset Shape tool, with white on foreground color and background color null, draw a big circle with 15px of stroke. No matter if your top and bottom are outside of the image. Object > Align. Center in canvas. Convert to raster layer. Rename this layer to CIRCLE. Select inside the circle. Add a new layer and move it below the shape layer.
6. Open paper-1. Copy and paste into selection. Deselect.
7. Click on first layer. Open lanterns. Resize 50%. Copy and paste as new layer. Move it to right. Rename the layer to LANTERNS.
8. Open heartstring. Copy and paste as new layer. Move it down to show the heart and key then move it to right.
9. Open chair. Resize 50%. Copy and paste as new layer. Move it down.
10. Open your tube, resize if needed. Copy and paste as new layer. Place it over the chair. Add a suitable shadow.
11. Open mushroom-2. Resize 30%. Copy and paste as new layer. Move it down and to left.
12. Open teapot. Resize 15%. Mirror. Copy and paste as new layer. Place it over the mushroom's right edge.
13. Open mouse. Resize 20%. Copy and paste as new layer. Move it to left and place it like it is holding the teapot.
14. Open teacup. Resize 15%. Copy and paste as new layer. Move it down left. I placed mine over Alice's book. Before add any shadow, select the smoke, copy and paste as new image. Reserve it for later.
15. Add a new layer and fill it with #8fbed2. Select all. Contract > 6. Delete. Deselect.
16. Add a new layer and fill it with #760f0f. Select all. Contract > 4. Delete. Deselect.
17. Add a new layer and fill it with black. Select all. Contract > 1. Delete. Deselect. Noise: Gaussian - 100 - Monochrome.
18. Open sugarbowl. Resize 10%. Copy and paste as new layer. Move it to left and place it on mushroom's left edge.
--> Add your copyright info and license#. Add your name. If you do not want it animate you can save it here as PNG.
ANIMATION
1. PSP -> Turn layers from LANTERNS up invisible. Copy merged.
2. ANIMATION SHOP -> Paste as new animation. Duplicate this frame to a total of 13 frames. Click on first frame and select all. Activate Propagate Paste.
3. ANIMATION SHOP -> Open the sparkle animation. It has 13 frames. Select all. Copy. Paste into selected frame. Position it on left side and click to paste it on all frames.
4. ANIMATION SHOP -> Basck to sparkle animation. Mirror. Copy and paste into selected frame, now place it on right side and click to paste it on all frames.
5. PSP -> Turn layers from LANTERNS up visible. Turn layyers from CIRCLE down invisible. Copy merged.
6. ANIMATION SHOP -> Paste as new animation. Copy. Activate the background you made. Paste into selected frames.
7. PSP -> Click on the smoke image you reserved. Resize canvas to 120x120 - Center. Copy merged.
8. ANIMATION SHOP -> Paste as new animation. Insert image effect. Look for Underwater and use the settings below:


9. ANIMATION SHOP -> Delete the first frame. Select all. Copy. Activate the tag you made. Paste into selected frames. Place it over the cup smoke and click to paste it on all layers. Save as GIF.
--------------------------------------------------
ANOTHER VERSION
Just changed the position of the sparkle animation.
I added it behind the circle frame here and used a smaller copy of it than the one I used on the tutorial tag.
