
Tutorial written by Joanne Salgado on February 18th, 2015
Any resemblance to any other tutorial is coincidental.
Do not copy and paste this tutorial anywhere on the net.
If you want to translate please ask first.
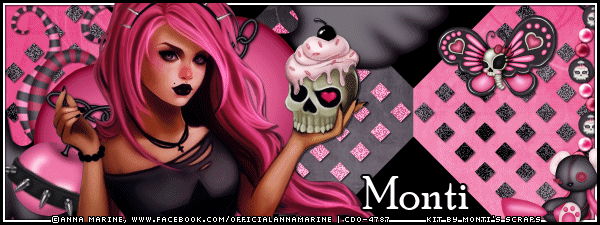
Tube: Anna Marine - you can purchase here
Kit AnnaMarine-50-1 by Monti's Scraps - you can purchase here
Template by Allison here
Font: Poor Richard
Don't forget to save often.
1. Open the template. Duplicate. Close the original. Delete de info layer. (Since there's a few forums that only allow width of max. 600 I used Image/Canvas Size and change the dimensions, but if you want you can work with the template as it is).
2. Open paper 'ScrapMonti_IB-AnnaMarine-50-1-Paper7' copy and paste as new layer. Move this layer above the background layer.
3. Open paper 'ScrapMonti_IB-AnnaMarine-50-1-Paper6' copy and paste as new layer. With the eraser tool clean the paper from the left and right side. It will be only in the center. Use the upper and lower triangles to know de exact place to clean. (see my tag)
4. Select the triangles middle layer. Open paper 'ScrapMonti_IB-AnnaMarine-50-1-Paper7' again, change the flood fill to pattern. Look for the paper and colorize it.
5. Select the triangles right layer. Open paper 'ScrapMonti_IB-AnnaMarine-50-1-Paper6' again, change the flood fill to pattern. Look for the paper and colorize it. Do the same with triangles left. Merge the three triangles layers together. Rename ANI.
6. Select lower right triangle layer and colorize it with black. Do the same with upper right triangle layer.
7. Open element 'ScrapMonti_IB-AnnaMarine-50-1-Element9' copy and paste as new layer. Resize 40%. Arrange it to the far left of the template.
8. Open element 'ScrapMonti_IB-AnnaMarine-50-1-Element13' copy and paste as new layer. Resize 20%. Arrange it to the upper right.
9. Open element 'ScrapMonti_IB-AnnaMarine-50-1-Element34' copy and paste as new layer. Arrange it to the left with a part above the vines.
10. Open element 'ScrapMonti_IB-AnnaMarine-50-1-Element36' copy and paste as new layer. Resize 20%. Arrange it to the bottom left.
11. Open element 'ScrapMonti_IB-AnnaMarine-50-1-Element15' copy and paste as new layer. Resize 20%. Image/Rotate/Free Rotate - right/25. Arrange it on top of the cherry and with the eraser tool clean the inside part to look as its around the cherry.
12. Open element 'ScrapMonti_IB-AnnaMarine-50-1-Element33' copy and paste as new layer. Resize 50%. Arrange it to the far right, only one side will appear. (see my tag).
13. Select the inner border layer. Colorize it white.
14. Open element 'ScrapMonti_IB-AnnaMarine-50-1-Element11' copy and paste as new layer. Resize 20%. Image/Mirror. Arrange it to the bottom right.
15. Open your tube. I used Anna Marine. Copy and paste as new layer. Arrange it to the left above the heart.
Add shadow as you like. I used 1-1-65-2 black.
Add copyright.
Add name. I used Poor Richard 26 white with black border.
Save.
For Animation.
1. Select the ANI layer. Duplicate it two times, you should have a total of three. Rename the other two ANI2 and ANI3.
2. With the ANI layer selected. Adjust/Add-remove noise/Add Noise - uniform/40/monochrome checked. Add drop shadow if you want.
3. Select ANI2. Adjust/Add-remove noise/Add Noise - uniform/40/monochrome checked. Add drop shadow if you want.
4. Select ANI3. Adjust/Add-remove noise/Add Noise - uniform/40/monochrome checked. Add drop shadow if you want.
5. Hide layer ANI2 and ANI3. Edit/Copy Merged. Go to Animation Shop. Paste as new animation.
6. Back to PSP. Hide ANI layer. Open ANI2. Edit/Copy Merged. Go to Animation Shop. Paste after current.
7. Back to PSP. Hide ANI2 layer. Open ANI3. Edit/Copy Merged. Go to Animation Shop. Paste after current.
Save as gif.